If you're like me, you have barely there eyebrows. That means eyebrows that are too skinny, too pale, too thin, too... non-existant! Since my most dedicated reader (hint, hint... she gave birth to me) wrote in asking for help on filling out naturally thin, barely there brows, I was obviously all too happy to help to help her! I'll be giving 4 simple tips on how to achieve a natural, every day eyebrow when you don't really have one to begin with.
And don't be put off by the detailed instructions- it's really quite easy to follow! I'm just a detail oriented person and will be showing you step-by-step how to shape and fill your thin brows. Here we go...
And don't be put off by the detailed instructions- it's really quite easy to follow! I'm just a detail oriented person and will be showing you step-by-step how to shape and fill your thin brows. Here we go...
I've been very lazy lately and haven't been plucking and shaping like I should, so my brows started off this little eyebrow makeover session completely natural, unshaped, and without any filler at all. Basically they were just sitting there like two pathetically thin lines across my forehead!

(On a side note, please forgive the clumpy mascara and not bothering with face makeup. It's been a long day! lol)
So how do we go about fixing these thin, crooked little lines parading as eyebrows? Follow these 4 simple steps!
1) Shape Those Brows! One of the biggest mistakes I've made over the years concerning my brows is that I didn't have enough of a brow to shape them. WRONG! Even if they're pale and barely visible to the naked eye, they are still in fact there. Almost. No matter how little you've got though, you need to shape those brows and give them the arch you always wanted!
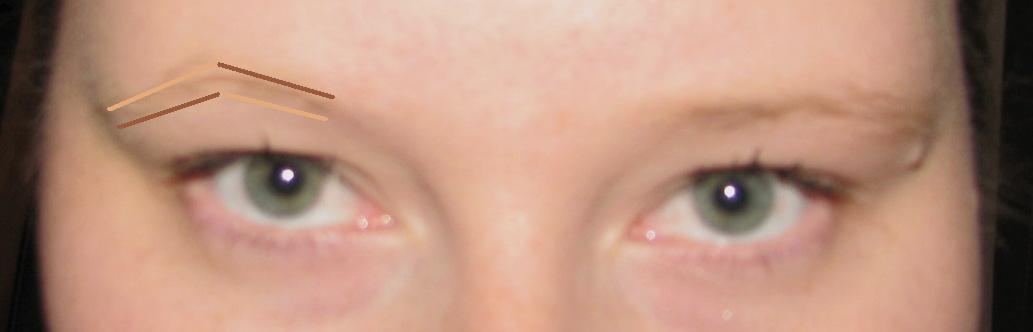
Start by finding the center of your brow and go slightly outwards (where your arch should be) From the point down, start plucking down the top of the brown on the side closest to the nose. It should be following an invisible line like in the picture below. This helps to make the arch more defined.

Now do the same thing on the BOTTOM of the outside brow. First, find your arch and go slightly up into the brow hair. Then draw your invisible line and start plucking downwards. As you can see it doesn't exactly follow the natural line of my brow but you will be shaping it to fit in between those little invisible lines.

If it seems like you're plucking a lot of hair when you don't have any to spare... don't worry! Brows are easy to fill in and it's the shape that is most important! The end result from shaping should look something like this (brow on the left is shaped, one of the right is normal)

Even though the brows are thin, you can already see a notable difference just due to the shape. The one on the left is much more arched and makes my eye look bigger.
2) OUTLINE! Once you have gotten the basic shape of the brows you want, use a pencil one shade darker than you natural brow color to outline them. You will follow the invisible lines where you plucked and also further enhance the arch by outlining the now plucked shape of the entire brow. It should follow a line like this:
Don't smudge the line or blend it in. It is supposed to be darker so it will give you a defined edge and shape within which you will work. We'll blend later. It should look like this (more or less) when you finish, depending on how hard or soft a line you put. (again,... left one is done, right one is natural.)

3) FILL! Now that you have a shaped, arched, outlined brow to work with, it's time to fill it in. Choose a matte eyershadow the same color as your hair color (or similar at least). In my case, I'll be using a slightly darker color than my natural brow since my hair is currently dyed darker. Using a clean shadow brush, swipe the shadow from the inside point up to the arch. Get more shadow and then sweep it from the arch down to the outside point. You're brows should look nice and filled. Use your finger to blend it slightly.

If you've gotten too much shadow on and/or it's too dark, get out your every day compact with pressed powder and sweep it lightly over your brows. It will instantly tone down the color and make things look much more natural. It will also take out the shimmer if you don't have a matte eyeshadow to use when filling the brow.
4) ACCENTUATE THE POSITIVE! Now that you have gloriously arched (yet natural) brows that are filled in and fuller looking, there is only one final step. Taking a pale pink or beige shimmer shadow, brush it slightly under the outline of the brow. It will give even more definition to your new arch.
Then take a matte nude eyeshadow and brush it along the UPPER outline of the brow. Again, it gives definition without there being noticible makeup floating above your brows.

It will look like this:

Make sure you keep your brows even with all this shaping and plucking. Mine are very uneven naturally, but they actually look semi-even and equally full after I'm done. The color is important too- although I'd love to have darker brows, anything darker than what I have on in the above picture is too dark for my skin/hair color. Play around with the eyeshadow on your brow until you find just the right shade! Of course, there are also a lot of shadows made specifically for eyebrows so you are sure to find a color there! In my case, I have a good, cheap eyeshadow I use that works great! So why would I buy an expensive brow shadow when my own works equally well?
Also make sure that both brows end and start in the same place. It sometimes helps me to make a quick swipe at the start and finish of the brows with a q-tip, your finger or a clean shadow brush to get an even line and remove any excess powder.

So... remember where we started? Barely there brows that were untamed, uneven and thin. Let's refresh our memory, shall we?
And here are the final results with both brows done!

Simple, natural and ready for every day!

In the end, I may never have the
gloriously thick eyebrows of Keira Knightly....

or the uber-arched ones of Megan Fox...
...but I'll take my new eyebrows over my old barely-there ones any day! :)
Good luck!!!


7 comments:
Well, I must say well done and done in a way that even I can possibly attain. Will work on mine tonight and let you know how it goes. Yours look super and yes, they do really make your eyes look larger. Thank you for all the work and posting just for me, but I am betting mothers will benefit as well. Hope you hear from them soon:) Mom
wow great tips, your eyebrows look great! thank you so much for leaving the sweetest comment on my blog, it made me so happy! :) have a wonderful president's day weekend!
Amazing Tips..I'll be putting them at practice for sure. Check out my blog and follow if you like. I'll be following yours. Happy Blogging
http://fashionmakeuplifestyle.blogspot.com/
left something for your blog on my page.
I love your blog!!!
Check out mine? http://fashionistaunitedinc.blogspot.com/
i think they look like shit
Your eyebrows are horrible, use castor-oil plant oil and they will definitely grow faster and thicker and you will have eyebrows almost like Keira. I don't want to offend you but they are so chaotic. Kisses, hope it will work for you, as for me did.
Post a Comment